Saw Number
This is the number that you will see on the suppliers’ websites and this is how you will buy your saw blades. The numbers range from 10 which is the largest blade and reduce down through 0 zero to 10/0. Below 0, the digit increases and is followed by / 0. You can think of these as being “below” zero. 10 is the largest, zero is a medium, and 10 / 0 is the finest. You probably don’t need all of them. For most people, a few packs of the large, medium, and fine will suffice. For example, 8, 1, 8/0
Blade Width
This is the width or thickness of the blade from side to side. This important figure indicates the cut that it can make. The larger, coarser blades are wider and so can’t cut as fine a line as the thinner blades can. However, the wider blades are much stronger and less prone to break.
Blade Depth
This is the front to back measurement, from the tip of the teeth to the back spine of the blade. This determines how well the blade can maneuver around a tight corner. A deep blade will be more difficult to turn but is often better for cutting straight lines. Whereas a shallower blade will turn tighter and be better for very fine piercing work.
Important note: Some of the new Swiss saw blades now have curved spines. This allows for increased manoeuvrability in tight areas whilst maintaining depth and strength to the blade.
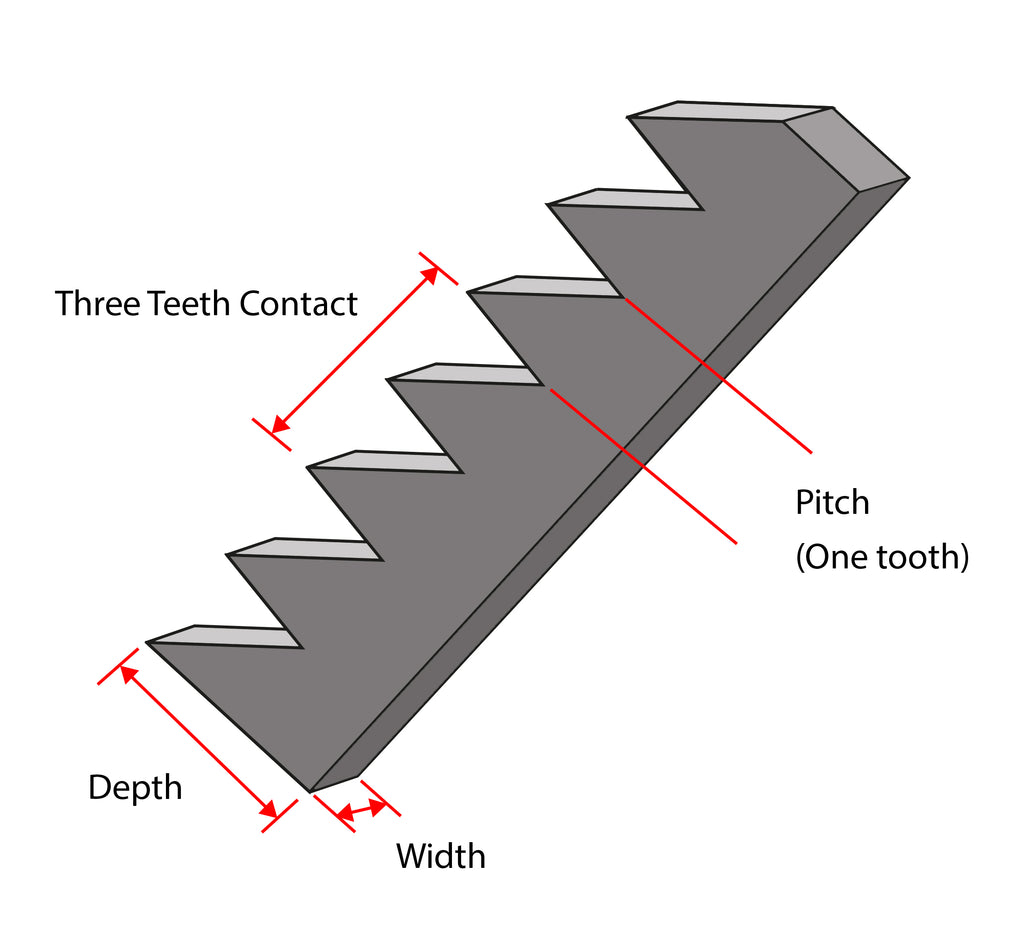
Teeth per CM
As the name suggests, this is the number of teeth along 1cm of the blade. The large blades will have fewer teeth as they are larger. The finer blades will have more teeth but smaller.
Pitch (one tooth)
The term pitch can have several meanings, but here it describes the width of a single tooth from one valley to the next. Provided here for information, but not a vital figure to know. The next is more important.
3 Teeth contact
More important than a single tooth is this figure. This is the distance across the tips of three teeth. This is a vital figure, as when sawing it is important to have three teeth in contact with the metal. This ensures a good cut and avoids snagging on the material. This distance effectively determines the minimum thickness of material that the blade can effectively cut. Using a large blade on a thin sheet will snag and pull the sheet without cutting properly. This is because you may only have one or two teeth engaging with the metal, switching to a smaller blade will solve this snagging problem.
Minimum Material mm. VITAL INFO.
This is the minimum thickness of the material recommended for each blade. For example, if you wish to cut a 2.3mm sheet or thicker you should use a number 10 blade. This will ensure you have three teeth in contact across the thickness of the metal and ensure a good cut. Note this is a minimum, you can also cut thicker material than suggested or Vice versa you can also use a smaller blade. The important thing is that at least three teeth are cutting at any time. For example, you could in theory cut a thick 2.3mm sheet with the finest 10/0 blade It will cut, and I do this all of the time with very intricate designs. However, the chances of breaking a fine blade on thick material increase dramatically. It is usually advisable to use the largest blade suggested for the material you are working on. Perhaps reducing the blade a little, if you wish to increase detail or if you are encountering snagging.
Drill Size. (Vital info)
Very important. When piercing, this is the smallest hole you need to drill in order to thread the saw blade through it. This is determined by the thickness and depth of the blade. Although the chart gives the precise drill for each blade, you don’t necessarily need every size. For most purposes three sizes of the drill are sufficient. For example, a 1.5 Diameter drill will be suitable for 8,9,10 large blades. A 1mm Drill will cover the medium range blades. And a 0.5 mm drill for the finer 5/0 to 10/0 blades. For the absolute finest work, a 10/0 blade can be threaded through a 0.3 mm hole.
Important note.
Because the hole must accommodate the depth of the blade from front to back, the minimum hole required will always be larger than the ‘width’ of the blade and the line it can cut. For example, a number 8 blade can cut a 0.5 mm wide line. But will require a 1.2mm hole. You need to allow sufficient space in your designs to drill a hole in each section to be pierced.
Tip- shank drills are recommended as they are stronger than standard drills due to having a thicker shank. They can also be used in quick-change handpieces, without the need for changing collets or using three-jaw chucks.

Using a piercing saw.
Firstly, why is it called a piercing saw? The saw can be used to cut pieces of metal from a sheet, saw tubes, rods, and wire. But unlike a regular saw the jewelers piercing saw can also be fed through a small hole drilled in a sheet. Hence the saw blade can “pierce” the metal and cut out shapes from the middle of the sheet.
The other big distinction is that a jewelers’ saw cuts on the pull stroke, the teeth point towards the handle. You must fit the blade correctly in this orientation.
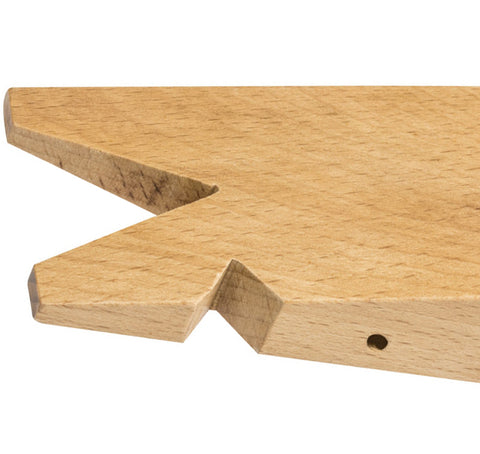
Fitting a blade
Having chosen the appropriately sized blade for the material, begin by holding the saw upside down and inserting the saw blade into the handle end of the frame and clamping securely. The teeth should be pointing up away from the frame and towards the handle. With fine blades, it is not always easy to see the teeth, but if you run your fingers away from the handle, you should feel the saw blade gripping your finger and it should feel rough. Likewise, running your finger gently in the opposite direction (towards the handle) you should still be able to feel the teeth, but they should feel noticeably smoother. Each time you insert a new blade, get into the habit of just running your finger on the saw to check the teeth point towards the handle.
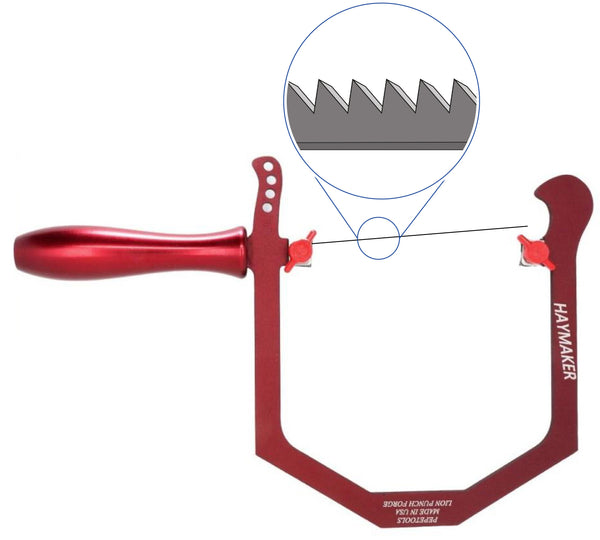
Above. Fitting a blade, note the position and direction of the saw teeth.
Tensioning.
The fine blade on its own has no strength. The strength is provided by the saw frame which creates tension along the blade and pulls it tight and rigid. With the blade clamped at the handle end, rest the saw frame against your bench, or into the groove on your bench peg. Bracing the handle against your chest, lean in to slightly bend the saw frame in. Whilst the frame is bent, insert and tighten the saw blade in the far end. When you release, the frame will hold the blade tight. Plucking the blade with your thumb should create a ‘ping’ sound. This sound is something you will get used to with experience. A low dull sound probably indicates that the blade isn’t under tension, it may snag and break when used. Likewise, a very high pitched ‘ping’ could mean the blade is under too much tension and this too could cause premature breakages, especially with very fine blades.
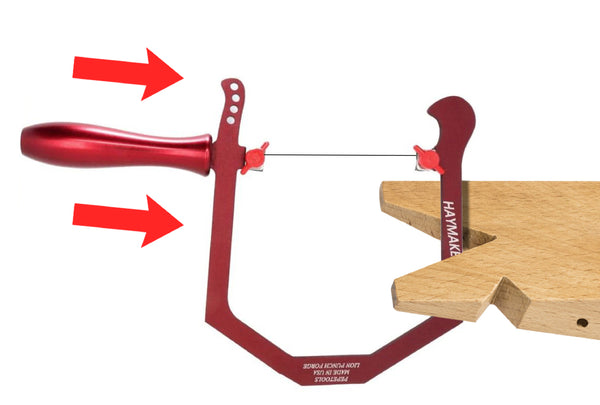
Above. Whilst pushing the frame against the bench peg, tighten the far end to secure the blade.
Lubrication
Lubrication is the real trick to using a jewelers’ saw. As the saw blade moves up and down in a very narrow space, lubrication helps prevent binding and sticking. Wax sticks such as the famous Pepelube are ideal for this. Simply wipe along the blade before use – it makes a huge difference! Pepelube is also great for lubricating your burs and drill bits, reducing friction, heat, and potential breakages. It greatly extends their life.

Pepelube is essential when sawing, drilling or using metal burs.
Tip: As you saw, filings and dust will be generated. This can very easily clog the saw blade and block the tiny saw cuts and holes you are working in. Keep a small dry paintbrush in your other hand and occasionally sweep your work clear of filings and debris.
For most sawing tasks, the best method is to rest the piece on your bench peg. Many jewelers have their bench peg sloped depending on use, but for sawing it should ideally be flat and level. Cutting a V-shaped groove at the front of the peg helps to support the metal as you saw.
Wooden bench peg. Note the flat, level surface and the V groove.
Sawing Position
The bench peg should be at mid-chest height when you are sitting comfortably in an upright position. The saw is held (in your dominant hand) with the handle pointing down underneath the bench peg, with the teeth pointing downwards and towards the bench. Your other hand is employed in holding and moving the metal. Remember that the saw cuts on the downward stroke. Keep your wrist and forearm fairly rigid. Bending your arm just at the elbow as you move the saw up and down. Don’t jig up and down furiously in short fast movements. Doing so is very inefficient. Use the whole length of the blade correctly and you will cut much faster. Keep the saw perpendicular and at 90 deg to the metal. You must maintain this posture and the position of your arm. Avoid tilting to the side, which will create inaccurate sloped sides to your piece. If you are following a line or pattern, keep your head in line with your bench peg so you can see the saw blade. As mentioned, use a brush to wipe away dust and filings so that you can see your pattern. When making tight turns, keep the saw moving up and down as you gently rotate the saw. As you change direction, reposition and rotate your piece with your other hand, keeping the saw blade within the bench pegs groove, and the piece fully supported.
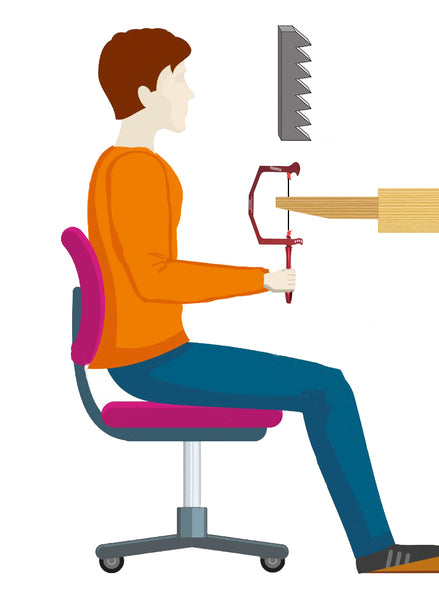
Seated posture for sawing. Note the height of the bench peg at mid chest, the forearm parallel with the floor and the wrist straight. Note also the orientation of the saw teeth, pointing away and cutting downwards.
Very Important tip: “Let the saw do the work”. You cannot force it, or the blades will simply snap.
Do not be tempted to push the saw forward to speed up. This again will simply result in breakages. As the saw cuts on the downward stroke, you can almost let the weight of the saw frame itself do the work. There is usually no need to apply any real effort or force. If it seems that the saw is not cutting (assuming it is fitted the correct way around), chances are that the blade is blunt and needs replacing. Even the finest saw blades can cut very thick metal with ease if used correctly, so if it isn’t cutting, then something is wrong. Use a jewelers loupe to inspect the teeth and check for wear.
Piercing.
When piercing out internal shapes (which are not connected to the edge of your metal) first begin by drilling a hole. Refer to the chart for the correct drill size, but as mentioned at the start, you usually only need a couple of drills that cover your saw blades. Use a center punch to mark the spot and remember to lubricate your drill. Once all the required holes are drilled, release your saw blade from the far end of the frame, keeping it clamped at the handle end. Thread the saw blade carefully through the drilled hole (from the back) and move the metal down to the handle. Tension the blade as before by pushing the frame against your bench peg and then securing the blade at the far end.
Tip: Thread your saw blade through from the ‘back” of the piece. So that when laid on your bench peg the front of the piece is facing up, with your lines, pattern, etc. visible.
New saw frames.
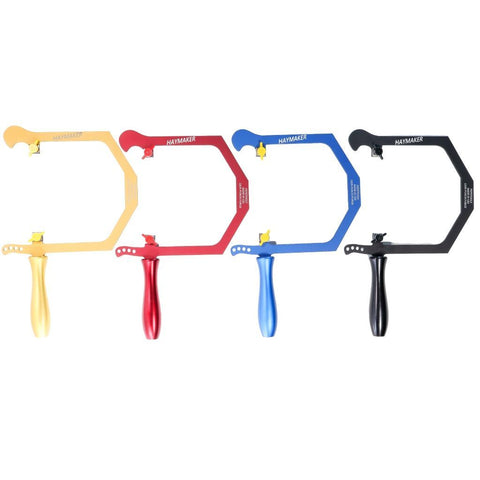
For many generations, the classic jewelers’ saw hasn’t changed. A simple steel frame with a wooden handle. But new advances in modern metals and engineering processes have now brought the jewelers’ saw into the 21st century. Pepetools in collaboration with Lion Punch Forge have recently launched the “Haymaker” jewelers’ saw. This features many refinements on the classic design and uses the latest materials to enhance this classic tool. The Haymaker frame is made from a special Aluminum alloy. This gives strength to the frame and provides tension to the blade. However, this space-age material is lightweight, resulting in a featherweight saw. This in turn makes for easier use and a much more intimate feel. You are much more in touch with the saw and how it is cutting. The handle is also made from Aluminum, precision machined for a smooth comfortable grip at any angle. The saw also features easy to use levers for clamping the saw blade. Finally, the whole saw comes finished in a beautiful anodized finish in a range of colors. Not only does this look cool, but it also provides a resilient protective finish to the saw.

The Haymaker saw by Pepetools
Top tip: If you regularly use different sizes of saw blades, a great idea is to have a couple of Haymaker frames in different colors. Each color can be reserved for a different grade of saw blade, for instant identification. Just grab and go.
The Haymaker saw frames in a range of colors. Designate different colours to different blades for quick and easy changing.
Buying Blades
Most important tip of all... always buy the best quality saw blades you can get. Avoid cheap low quality imported or unbranded blades.Remember it's the blade that does the cutting. Pepetools line of NANO blades were developed from the ground up to last longer, and cut straighter.

Blade storage.
Organize your blades. Once you take the saw blades out of the packet it can be almost impossible to identify one size from another. This handy little storage can from Kerf both protects your blades and also allows for easy storage and identification. A great addition to any workbench.
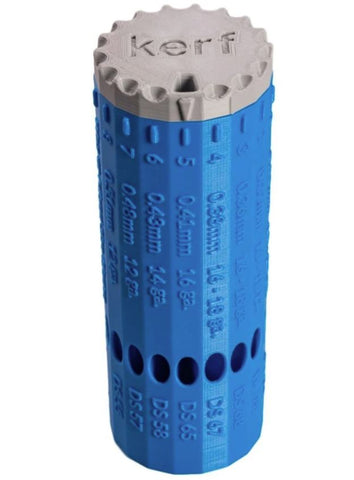
KERF 3D Printer Saw Blade Organizer
(Click to find out more)
Written and illustrated
by Dave Wilson
www.celticdreams.co.uk