A great guide on lost wax - for the full PDF version please click here
PREFACE
Welcome to the world of lost wax casting. It is the Authors intention to impart the necessary information and process that is vital in being successful in this endeavor.
This original manuscript was first written in Spanish under the name, Secretos, which of course translated means, secrets. This name is by
no means accidental. In the jewelry industry as well as other works of artistry the process or secrets were passed on to only family members. The non family member shop employee was relegated to only certain parts of the process but never given the entire method and/or process from start to finish. This prevented, in some obscure way, creating competitors. Lost wax casting is by no means considered a new form of art. Castings have been found dating back to early century Europe, the Shang Dynasty in China and in the ruins of the Aztecs and Mayans in Mexico. Lost wax casting has come a long way since those times but we must not forget the fact that these early artisans mastered their art to such an extent that much of their work is viewed today as extraordinary.
I feel certain that if you read this manual and understand the concept, you will realize that you, too, can perform all that is written here with confidence.
A SYNOPSIS OF THE PROCESS OF LOST WAX CASTING
The following is a simple explanation of the process of lost wax casting. This process is thoroughly explained and analyzed, step by step, in the following pages.
All lost wax casting begins with a wax and/or similar material of a pattern or model. A sprue is attached to the model and the model and sprue are then attached to a rubber sprue base.
Wax model Sprue
Rubber sprue base
A metal cylinder, called a flask, is secured into the sprue base surrounding the model.
Flask (metal cylinder)
The flask is then filled with a mixture of a material called investment,
which resembles plaster of paris.
Rubber mixing bowl With investment
1
After the investment hardens, the flask (minus the sprue base) is then placed into a burnout furnace.
The temperature of the furnace rises over a period of time, from 300°F to 1350°F. During this period of burnout, the wax model is “lost” leaving
a cavity in the investment. Hence, lost wax casting. After dropping
to a lower casting temperature, the flask is then placed into a casting machine, centrifugal or vacuum, metal is melted and cast.
2
The flask is then submerged into a receptacle of cold water and the investment breaks away from the casting.
The casting is then cleaned of all the investment that has adhered to
the surface. The model is cut from the sprue and finished with files, emery paper and other finishing compounds and equipment to produce a finished product.
3
THE EQUIPMENT, SUPPLIES AND MATERIALS NECESSARY FOR LOST WAX CASTING.
This equipment is necessary in order to be able to successfully carry out the process whether it is small, medium or even large amounts of casting.
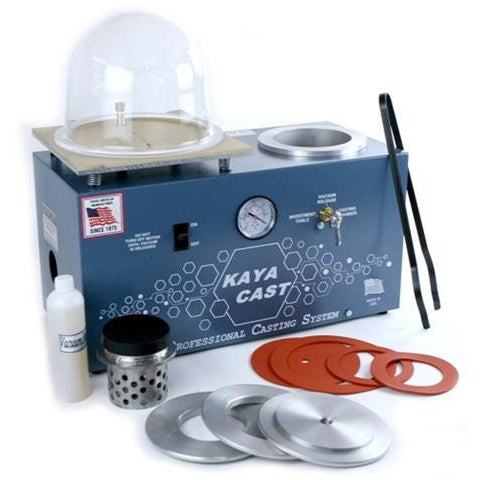
No.1 Vacuum casting machine. Although available in various models, the function of the machine is basically the same. It is important that a vacuum machine is chosen that will allow the user to not only remove or extract air from the investment mixture but also perform vacuum- assisted casting.
4
No. 2 Centrifugal casting machine. This machine is not necessary if you have a vacuum machine with casting capabilities.
No. 3 Burnout oven. The burnout oven should be of ample capacity for your present use and for future growth and/or larger items you may wish to cast. If at all possible, obtain an oven with an automatic controller. These controllers normally provide you with programs
for two to three burnout options. The controller changes temperature automatically, including the final cooling down to casting temperature. The next best option is a manual controller. Manual controllers maintain the temperature set by the operator and holds this temperature until the operator changes the setting. Control of the burnout temperature is vital.
5
No. 4 Casting flask and rubber sprue bases. Both are available in many different sizes in standard and perforated. Perforated flasks are normally used for casting trees. Trees are multiple castings of patterns sprued on a single center stem. Rubber sprue bases are made to fit the individual flask and are available for casting trees or base castings.
No. 5 CC or ML graduate. To measure the proper amount of water used to mix investment.
6
No. 6 Scales. Necessary to properly weigh the amount of investment used to fill the flask.
No. 7 Timer. Used For timing the working time of mixing and pouring the investment.
7
Along with the preceding equipment, these accessories and/or consumables will be needed:
Investment, vac-u-coat, rubber-mixing bowl, flask tongs, gloves-asbestos free, crucibles, spatula for mixing investment, assorted waxes, electric wax working tool or alcohol lamp with wax spatulas.
8
THE LOST WAX CASTING PROCESS
First and foremost, I want to impress upon you, the reader, whether you intend to do this for a hobby or as a profession, these very important two words. PROCESS CONTROL
The caster or artisan either has control of the process or the process
is out of control. Process control ensures the caster of known results consistently where as no control has no assurance of consistent results.
In lost wax casting, the very first thing you must have is a wax pattern. Wax patterns are obtained in three different ways.
-
Design and model the wax pattern to the satisfaction of the caster and/or artisan.
-
Make a rubber mold from a metal model and inject the mold with wax. This method is used for the infinite reproduction of castings. The mold making process is thoroughly and completely explained in its own section of this book.
-
Purchase a wax pattern from your jewelry supply store where casting equipment and supplies are sold.
The wax model should be finished as though it were the actual piece of jewelry. The reason is that the more the wax is finished the better and cleaner the casting will be. This will afford you less time in finishing the casting. This is a very important point whether you are casting one piece or hundreds of pieces.
9
The wax pattern is attached to a sprue. What are sprues? Sprues are extruded wax wires of different sizes usually round. Sprues are used in these four (4) basic functions:
-
Holds the wax model in place
-
Allows for an escape route for the wax
-
Allows an entrance for the metal to be introduced into the cavity
-
Allows for the proper solidification of the metal
Function No.4 is of extreme importance. The technical name for this process is:
PROGRESSIVE SOLIDIFICATION
Controlling the solidification of the metal in the flask will help eliminate many of the problems of one of the most dreaded word in casting, “porosity”, also known as metal shrinkage. Porosity in castings is tiny holes or pitting on the metal. The more you try to file or polish out the pitting the more pronounced they become.
Four important points to remember in order to control the problem of porosity.
1. Sprues, thickness and location
2. Casting temperature of flask when cast*
3. Proper button size*
4. Temperature of the metal when cast*
* Points 2, 3 & 4 will be explained in detail further in this section.
10
THE RULES CONCERNING SPRUES
-
All sprues should be as thick or as heavy as the thickest or heaviest part of the model.
-
Sprues should be attached to the heaviest or thickest part of the model.
-
Two thin or light sprues will not replace one of the proper size.
Example: Two thin or light sprues are attached to a wax model. After casting, the two thin sprues will solidify much faster than if it would have one sprue of the correct size. The solidified sprues will not allow the cast model to feed from the button. Once cut off from the button, the cast piece feeds it’s self. The heavy or thick parts of the casting draw from the thin parts causing metal shrinkage or porosity.
4. There are no limits as to the amount of sprues that can be attached to the model.
5. Sprues should be as short as possible leaving enough space to cut off the cast piece.
In many cases such as production casting of rings, the sprue is attached to the bottom of the shank, which is also part of the wax mold injection system.
11
In preparing rubber molds, the sprue is positioned on the bottom of the shank. This location permits easy attachment of models when casting trees.
When using this method of casting you sacrifice applying the sprue to the proper location that will provide for proper progressive solidification. With this in mind, the manufacture will design the ring or model that will allow progressive solidification to take place.
When spruing trees, be certain to allow a minimum of two millimeters between models.
After the sprues are properly applied to the model, the model with all sprues attached is weighed on a gram or pennyweight (dwt) scale. This information is vital since it will allow you to know how much metal is needed to cast with, the exception being the amount of metal needed for the button. The button is a very necessary part of the casting. The button is vitally important in controlling the progressive solidification of the casting.
12
The ideal solidification process is for the furthest point of the casting from the button to solidify first, next, the sprues and last, the button. Controlling this will go a long way in avoiding the porosity problem.
The following method is used to obtain the proper amount of metal needed for the button. There are two types of sprue bases. These are the flat center types used for applying the patterns directly onto the base and the other type has a cone center used in casting trees.
Flat center Cone center
Model a piece of wax to simulate the center of the sprue base in diameter and shape. Make the thickness of the model wax button one half to
two thirds the height of the center. Once this simulated button is made, weigh the wax button model and add this weight to the sprued wax patterns. This total wax weight will now give you the total amount of metal needed to cast this flask.
The thickness of the button is critical, if it is too thin, it will affect the progressive solidification of the casting. If you have used too much metal and are using a centrifugal casting machine, it is possible that when cast, all the metal will not empty from the crucible and result in the metal solidifying partly in the crucible.
13
In most cases, when this occurs, the crucible will have to be destroyed. If you are using a vacuum assist casting machine and an excessive amount of metal is poured into the flask, it could result in metal spilling on to the rubber vacuum gasket, which will burn and or could spill or splash on to the caster.
The wax weight of the button for the different sprue bases you may be using should be noted and saved for future use. The value (wax weight) will always be the same when using the same sprue base.
The total wax weight of the sprued models that is contained in the flask and the weight of the simulated button are then multiplied by the number in the following chart. The result is the actual amount of metal needed to cast this flask.
Type of metal to be used in casting:
Gold 18k 14k 10k
Silver Bronze Copper
Multiply wax weight by:
              16
              14
              14
              10
              10
              10
Example: Total wax weight, 2.7 grams. X 14 = 37.8 grams
14
Once you have this information, it should be noted or written down so that this information will be available to you when casting. It is not wise to rely on memory. If you are casting more than one flask you should make a chart with following information:
-
Flask numbers 1, 2, 3 etc.
-
Total wax weight
-
Type of metal to be used
-
Metal weight
-
Temperature required for casting
All this information is important to avoid mistakes when casting.
Example of a typical chart used in casting:
Flask No. Wax weight
-
1 2.5 grams
-
2 5.7 grams
Metal
14KY S.Silver
Metal weight
35 grams 57 grams
Casting temp.
900°f 1000°f
15
ATTACHING SPRUED MODELS TO THE SPRUE BASE
The easy way to accomplish this is to use an electric wax spatula also known as a wax worker. If this tool is not available, use the old standard alcohol lamp and wax spatula. The models are attached to the sprue base using a wax adhesive called sticky wax. Sticky wax is also used
in attaching sprues to wax patterns. Sticky wax is great. It adheres and dries quickly. Be certain that the union is secure and completely sealed around the entire circumference.
Sprue Base
This is a must, as patterns will break off their sprues if not properly attached. If the sprue that is attached to the sprue base is not properly sealed, fins of investment could break off and seal off the entrance for the metal going into the flask when cast.
Minimum 4mm
16
Allow a minimum space of four (4) millimeters between the models and the wall of the flask. Also, there is a minimum of one half inch (1/2”) above the models to the top edge of the flask on flasks that are two
and one half inch (21⁄2”) in diameter. Any flask with a larger diameter must have a minimum of one-inch (1”) of space. This space is there
to form the cap of investment that will keep the hot molten metal from going through the flask when cast centrifugal. It will also prevent the investment from being pulled out during vacuum assist casting.
Fig. 1 Fig. 2
Before incasing the models in its flask, spray the wax patterns with
a liquid known Vac u coat. This is only one of the many names this liquid is known by. This liquid is a surface tension reducer, which will allow the wet investment to adhere to the wax patterns. Investment manufactures normally build in a wetting agent into the investment but this step is a necessary precaution.
The next step is to incase the models in the casting flask. Be careful
to not hit the wax models with the sides of the flask. This could and usually results in the wax patterns breaking. In the event that more than one flask is being used, place a small piece of masking tape on the side of the flask and mark it with an identifying number.
17
PROPER MIXING OF INVESTMENT POWDER
Mixing investment correctly is basic to ultimate results in lost wax casting, beginning with the water which should be at room temperature. Water that is too cold may cause the wax patterns to become too brittle and retard the setting or hardening of the investment. Water that is to hot may cause the wax patterns to distort and could also accelerate the setting or hardening of the investment. Consequently, the amount of investment powder used in the mixture is vitally important.
Just how important is it to measure water and weigh investment powder? Consider this. Back in the middle 70’s I sold a complete casting outfit
to a well known research facility in Texas. The engineer that was responsible for conducting their study and research in this lost wax casting project came to our store and learned how to properly use all the equipment.
18
Happily, they went to their facility and conducted their test successfully for over a year. During this time, they had purchased several one hundred pound drums of investment and were completely satisfied.
One day, I received a call from the very same engineer I had taught
the process too complaining that the last drum of investment they
had received was old and was cracking during the investment set-up and burnout procedure. I asked him all the proper questions on the investing procedure which he answered satisfactorily. Not being able
to diagnose his problem through our conversation I invited him to come over to my shop with some of his investment and we would work on the problem. Upon his arrival I asked him to please mix some of investment so I could watch and maybe detect the problem.
Although I had all the necessary equipment to perform this task, mainly investment scales and water measuring graduates, he just went directly to the water faucet, drew some water in the mixing bowl and then added the powder he had brought with him. He mixed the slurry for a minute or so and presented it to me as finished. My first question was why
did he not measure the proper amount of water and weigh the proper amount of investment? His answer was that he had been doing this for over a year and he knew the look and consistency of the slurry and did not have to go through that part of the process. My second question was how long was he waiting to start the burnout procedure? His answer was that he waited until the investment was hard, about fifteen to twenty minuets, and then went to the burnout process.
Finding the answer to his problem was truly simple. Although he had answered all my questions over the phone correctly, what he was actually doing was different. I explained that investment does not get old and unusable.
19
The only thing that could happen to the investment outside of accumulating moisture which in this case the investment would harden, is that the setting time might vary slightly but it would not change
the procedure of how you use it. Without measuring the water and weighing the investment powder, the caster would never have the same consistency in the slurry mixture, sometimes to thin, sometimes too thick. Secondly, not waiting the proper amount of time for water to dissipate from the investment caused the water in the investment to boil which caused the investment to crack. Feeling that we had solved his problem he went back to his shop and later reported that all was well after going back to following the proper procedures. Again, the evidence of PROCESS CONTROL is proven to be of utmost importance.
The majority of investment manufactures suggest a mixture of 182cc (ml) of water to 1 lb. (454 grams) of investment. Always follow the manufactures suggested water/powder ratio mix. The manufactures also tell us that the normal working time for mixing the investment is nine (9) minutes with setting of the investment occurring between the tenth 10th and the 11th minute.
The nine-minute working time begins when the powder is introduced to the water. The full nine minutes cover the mixing of the investment, evacuating or extracting the air from the mixture with the vacuum machine, pouring or filling the flask with the mixture also known as slurry, removing the air that was trapped in the flask when it was filled and the flask set aside and allowed to set or harden undisturbed.
20
The nine-minute working time is to assure that the investment is well mixed and will not separate. Less working time will result in the water separating from the investment and rising to the top of the flask. As the bubbles of water rise past the wax patterns, a fine line of investment is removed from the surface of the pattern. When cast, these will appear as lines or veins on the sides of the cast piece.
Results of water/powder separation
from not using the complete mixing time
It is important that the following steps are followed which are fundamental in obtaining desired results.
No. 1 Calculate the correct amount of investment powder and water needed for the flask using the following table.
Flask height
Diameter Of flask
21
No. 2 Using a rubber-mixing bowl, initiate the mixture always introducing the powder to the water. Never the water into the powder. You may use a spatula, spoon or a hand electric mixer at its lowest mixing speed. Do not use the electric mixer at a high speed, as this will accelerate the setting time.
I once had a frantic call from one of my clients that manufactured class graduation rings. Their cause for concern was that their investment was hardening before they could finish the investing process. I immediately went to their shop and observed the procedure they were using. Since this was a small manufacturing shop they had no need for rapid production, they were never concerned for time of which they seemed to have plenty of. They had just received a large order for graduation rings from one of the local schools and had a time restriction on manufacturing the rings.
In their desire to speed up their process they decided to speed up the mixing time of the investment. They also decided to use an electric hand drill with a spatula from a hand mixer attached to it. The speed attained from the hand drill created enough friction heat that the investment was hardening in 4 to 5 minuets. Since investment creates its own chemical heat when mixed with water, the added friction advanced the setting time. Morrow of the story, Process control. Mix your investment slowly and thoroughly.
22
The mixing time is dependent on how many flask you are filling. If
you are filling only one flask, the mixing time will be longer than if you are filling several. In order to calculate the appropriate mixing time you must first note the length of time it takes your vacuum machine to extract the air from the mixture. Secondly, calculate the length of time it takes to fill your flask. Take these two calculations and add to it again the time needed for extracting air in the vacuum machine. This will allow you to know how much mixing time you have.
Example
Time needed to extract air from slurry in vacuum machine 1.5 min.
Time needed to fill one flask (multiply by number of flask) 1.0 min. (approx calculation) Time needed to extract air from flask 1.5 min.
Total 4.0 min.
In the above example, we calculate that we have five (5) minutes of mixing time.
We now have all the factors in the mixing of investment. The procedure is as follows:
No. 1 Set your timer to go off at nine (9) minutes
No. 2 Mix the slurry in the rubber-mixing bowl the proper time you have calculated.
23
No. 3 Place the rubber bowl on the vacuum machine on the black rubber pad and cover the bowl with the bell jar. Turn on the machine and move the valve to point to vacuum table or investment. As the vacuum pump extracts the air, the investment in the bowl will rise and when all the
air has been removed the investment or slurry will return to its original position. At this point, count to ten and move the valve lever to the release position. When the vacuum gauge is down to ten, turn off the machine and remove the bell jar.
If you are using a machine that has a casting table, be certain to remove the red rubber casting pad so as not to cover the suction hole as this will prevent the air from releasing.
In the event you have filled the rubber bowl beyond its capacity, as the slurry rises, bang on the investment table with your fist. This will help move the investment more rapidly down to its original position.
24
No. 4 Remove the rubber-bowl from the vacuum machine and fill the casting flask. Be certain to pour the investment slurry slowly and on the inner edge or side of the flask and not directly on the patterns. Be sure to completely cover the patterns. Fill the flask to approximately one half inch from the top edge. This is to allow for the investment to rise and not spill over during the next step.
No. 5 Place the filled flask on the black rubber pad and cover the flask with the bell jar. Follow the same procedure as in No.2 and extract
the air that was trapped in the flask during pouring. This time the investment will not rise as much as the first time but will rise a small amount and sit there and bubble as though it were boiling. At this point, once again, count to ten and release the vacuum by moving the valve to its release position. Once released, remove the bell jar and fill or cap of the flask with the remaining investment. Be sure to leave the investment very slightly below the edge of the flask. This is to insure a good seal on the red rubber pad at time of casting if using a vacuum assist casting machine. If the flask is filled to the top edge, it may not sit level on the red casting pad and it will be difficult to get a vacuum suction on that flask. In the event you have over filled the flask, after the investment hardens, scrape off the excess investment using a spatula. Remove just enough to level the investment to the edge of the flask.
25
After the flask have been capped; move them to a place where they will not be disturbed for at least 30 minutes. This phase is important since the investment could crack if disturbed during the setting up or hardening process.
The proper way to hold a filled flask is on the sprue base. Although sprue bases normally fit tight, the weight of the investment could make the flask come loose from the sprue base, spilling its contents.
Once the flask have been filled and set aside for the investment to harden for at least 30 minutes, the rubber sprue base may be removed. If casting more than one flask remove the numbered masking tape at this time and mark the number on the top of the flask with a piece of red rouge. Treat the flask gently, as the investment is fragile. The flask must sit and dry and or dissipate moisture for a period of one and a half to two hours. This is extremely important as too much moisture in the investment will crack the investment during burnout.
An invested flask can be burned out up to five days after investing. After five days, the flask must be re-introduced to water. Moisture is important to the burnout, just as excessive moisture is detrimental; no moisture is just as detrimental. The proper way to re-wet the flask is to fill an ordinary bucket with water and holding the flask in your hand, immerse the flask to the bottom of the bucket and remove quickly. Set the flask aside and again; wait the one and a half (1 1/2) to two (2) hours before burnout.
26
BURNOUT
Burnout simply means to burnout the wax that is encased within the flask. It sounds simple and it is, provided one can understand the concept of the burnout and what actually takes place during burnout. Proper burnout is as important as having good wax patterns, making sure that the waxes are properly sprued, weighing the investment powder, measuring the correct amount of water and mixing the investment properly, filling your flask and all the other aspects of preparing for burnout. Imagine doing all that preparation and then have unsuccessful castings because of improper burnout.
Eliminating wax from the flask is an important part of the burnout. It may not make a lot of difference if you are burning out one small flask but many flask or any large amounts of wax in any burnout will make
a difference. The importance of this is that during burnout the wax creates an acrid odor which could be harmful to persons and is definitely harmful to the burnout oven. Many programmable burnout ovens have a wax eliminating cycle set at 300 ̊F normally for one hour. This cycle may have to be run two or more hours in order to be effective. A metal tray will have to be put in the oven to catch the wax as it melts and removed before proceeding to the complete burnout cycle.
Picture or drawing of oven tray
27
Unfortunately this is a step that should be followed and may cause some problem but fortunately there is a much simpler solution. Wax eliminating ovens, autoclaves, are available in different sizes which will accommodate any size casting operation. These type ovens operate on heated water which produce steam which in turn melt the wax from the flask. The ovens normally operate on cycles of one hour and may at times have to run more than one cycle. The wax that is removed from the flask will harden on the surface of the water when the water cools and can be removed and discarded. The major precaution is that once the wax elimination is complete you must wait at least 1 1⁄2 to 2 hours before burnout as the investment has absorbed much water and this water must dissipate or dry to a point that it will not cause the water to boil and create steam in the investment causing it to crack.
28
The temperature range during burnout is from 300°F to 1350°F. This is what occurs in your oven to the wax and investment during the burnout cycles:
Oven temperature 300°F (149°C) 700°F (371°C)
1000°F (538°C) 1350°F (732°C)
The investment Dries
Begins to harden
Continues to harden
Has harden to be able to receive the molten metal without breaking during casting
The wax Melts
Has melted leaving a coating of wax that
has adhered to the walls of the cavity
and begins to carbonize
Has turned to carbon
Has converted to smoke and has left the cavity completely clean of all residue
As you can see, there is a transformation in the investment and the wax that is vital to successful castings.
Burnout ovens may be purchased with programmable controllers. Most come with built in programs. The following chart is a sample of a typical burnout program.
Hours 29
In the described program, the oven is preheated to 300° and maintains this temperature for one hour. The temperature will rise slowly over the next 3 &3/4 hours until it reaches 1350° and holds there for two hours. After these two hours the temperature will begin to drop holding at 900° for a period of four to five hours or how ever many hours are programmed.
The caster should wait at least two hours before casting as this will allow the temperature in the cavity of the flask to stabilize to the proper casting temperature.
If you have an oven that has no temperature controller, equipped with only a pyrometer and a stepless control switch, the following are two burnout programs. Please note that the stepless control switch on most ovens will not hold a set temperature. The oven pyrometer must be closely watched to try and maintain the temperature desired with the stepless control switch.
No. 1 A four hour burnout program with a two hour cooling period to casting temperature.
This is recommended for flask up to 3′′ dia. X 3′′ high One hour at 300°F
One hour at 1000°F
Two hours at 1350°F
Two hours at 900°F (casting temperature*)
30
No. 2 A seven hour burnout program with a two hour cooling period to casting temperature.
This is recommended for larger flask: One hour at 300°F
Two hours at 700°F
Two hours at 1000°F
Two hours at 1350°F
Two hours at 900°F (casting temperature*)
*The 900°F casting temperature is recommended when you are casting normal weight ladies, or gents light weight rings or other small articles. If casting filigree jewelry or very thin pieces, the correct casting temperature is 1000°F. Gents rings, which may be heavier,
can be cast at 800°F. It is up to the caster to determine what the
proper casting temperature will be. The heavier the item, the lower
the casting temperature. The thinner or lighter the item, the higher the casting temperature (maximum of 1000°F). The reason for this
is that we want the metal in the cavity of the flask to solidify quickly and yet we want the flask to be hot enough to allow the cavity to fill without solidifying before filling. If the metal stays molten to long, you increase the chance of having porosity through metal shrinkage.
31
When you are preparing your flask for casting be sure not to combine or mix lightweight items with heavier items.
Shorter burnout cycles are not recommended. Keep in mind that this also is a large part of PROCESS CONTROL.
CASTING WITH CENTRIFUGAL AND VACUUM ASSIST MACHINES
There are several forms of casting. We are going to discuss only centrifugal and vacuum assist. In order to accomplish this, you must have a means of melting the metal you are using. Metal can be melted in four different ways, by an electric melting furnace, gas melting furnace, induction heat or torch melting. For the small to medium caster, torch melting is by far the most popular and economical. Centrifugal and vacuum casting machines are available with its own built-in metal melting system. These machines can be purchased with either induction or electric melting capabilities. Prices on these types of machines
can range from approximately $5000.00 to over $30,000.00. For our purpose we will discuss only the values of torch melting.
Torch melting systems require oxygen and gas, of which the most commonly used are natural, propane or acetylene. Pressure regulators will be required for oxygen and bottle gas along with the proper melting torch. I recommend using propane gas as this is clean burning, inexpensive and readily available. Regulators normally have two gauges; one will measure the pressure in the tank and the other, the line pressure to the torch. For melting purposes, set both regulators to ten (10) lbs. of line pressure. This is adequate for achieving a rapid melt on the metal. To begin using the torch, open both valves on the tanks by turning the valves one quarter turn.
32
Set regulators to the correct hose pressure by turning the T-bar on the regulator clockwise to increase and counter clockwise to decrease pressure. When lighting the torch, always turn the gas on FIRST. Open the gas valve very slightly and Light the torch with a striker. Slowly open the oxygen valve. The flame will start to turn blue. Continue to open the gas and oxygen valves on the torch, in small increments until you have a strong, slightly oxidizing flame. A slightly oxidizing flame is blue with slight specks of red. A strong flame is necessary to achieve a rapid melt to minimize the oxidation of the metal. Do not be afraid of working with your torch but do have plenty of respect for the danger it poses.
CURING OR PREPARING THE CRUCIBLE
Metal is melted in a crucible. Ceramic crucibles are used for torch melting. Before using a ceramic crucible it must first be coated or cured with borax. Crucibles are cured in order to prevent the metal from sticking to its surface.
The proper way to cure a crucible is to first heat the inside of the crucible with your torch. Once it starts to glow slightly red, sprinkle borax in the crucible. Approach the borax slowly with the flame of the torch and heat the borax until the melts. The borax will appear like syrup. Holding the crucible with tongs and while the torch flame is still applied, move it around until the inside is coated with borax. Be sure to coat the edge or hole where the metal will exit the crucible.
33
CASTING WITH A CENTRIFUGAL CASTING MACHINE
Broken arm centrifugal casting machine
Centrifugal casting machines for torch melting are available in various forms and sizes. The size of the machine has to do with the flask size capacity. When we speak of a four-inch centrifugal casting machine,
we are saying that the machine will hold a flask up to four inches in height and four inches in diameter. Size is important, as you do not want to limit yourself to only small size flask. The four and six inch spring wound centrifugal machines will also hold the smaller size flask. Some machines are available already set in a protective enclosure and also available spring wound and motorized. The term, broken arm, is used to describe a casting arm that is hinged at the pivot. This design provides extra impetus or force to the metal as it enters the flask when the arm is released.
34
Centrifugal casting machines must be surrounded or enclosed in a protective tub or box. The best way is to construct a box using a minimum of three eighths inch (3/8”) plywood for the protective walls and three quarter (3⁄4”) plywood for the base. Make the height of the walls a minimum of four inches over the highest point of the casting machine and a minimum of four-inch horizontal clearance on the
arm. Once the protection shield is completed, secure the base of the centrifugal machine to the base of the shield. Be certain to position the base so that when the arm is locked with the stop post or pin that is in the base, the crucible is facing the operator. This is important, as it will be necessary for the operator to be able to see the metal in the crucible when melting.
35
The first step in using your centrifugal casting machine is to balance the arm. This is accomplished in the following manner. If the machine is
a broken arm type, first, wedge a toothpick or similar item where the arm pivots to keep the arm straight. Loosen the hold down nut on the arm but do not completely remove it. Place the flask to be cast, before burnout, in position on the casting machine. Be sure to use the flask cradle if necessary. Put the crucible in place and push the crucible up against the flask. The exit hole on the crucible must be as close to the center of the entrance hole on the flask as possible. This is in relation to the flask being above or below the entrance hole of the crucible. The baffle plate which separates the crucible from the flask should be right up against the flask.
Balance the arm by removing or adding weights and /or rotating the weights toward or away from the center. Leave the arm on the weight side just slightly heavy to compensate for the metal you will use to cast with. If you wish, you can place the metal you will be using to cast with in a plastic ziplock bag and place it on top of the flask and then balance the arm. Last step is to remove the wedge and tighten the hold down nut on the casting arm.
Having balanced the arm for the size of flask, mark the position of the weights on the arm and make note of the number of weights used for that size flask. This information will be helpful the next time you cast that size flask. Simply position the weights from the information you logged and you’re ready to cast.
36
Most manufactures of centrifugal casting machines recommend that the arm be wound three complete turns for flask that are 3” x 3” or smaller. For the larger flask, turn or wind the arm three and a half turns. The starting point is at the locking pin or post located in the base of the casting machine. The pin or post should be on the right side of the base when the part of the casting arm with the weights is also on the right. The arm will wind clockwise. Please note that as your machine ages and the spring weakens you may need to add another half or full turn.
The melting crucible must be cured with borax before proceeding as previously mentioned. Be sure that the exit hole for the metal in the centrifugal crucible is also cured with borax. Once the crucible is cured and mounted in the centrifugal casting machine, wind the arm the proper amount of turns and lock in place with the locking post that extends from the base of the unit. Be certain that the opening of the crucible is facing the operator so that the metal can be viewed during the melting process.
If you are working with more than one flask be sure to have them arranged in the burnout oven in the order in which you wish to cast. Have your metal weighed out and marked for the intended flask.
37
LETS RECAP OUR PRESENT POSITION IN THIS PROCESS.
-
Wax patterns have been properly sprued and attached to the sprue base.
-
The flask is properly placed on the sprue base.
-
The investment has been properly mixed and poured into the flask.
-
If more than one flask is being used, the proper information is
recorded.
-
Burnout has been accomplished and flask is at the Correct casting
temperature.
-
The centrifugal casting machine is in its protective safety enclosure.
-
The melting crucible has been cured and placed in the centrifugal
casting machine.
-
The arm of the casting machine has been balanced.
-
The proper cradle is in place.
-
The centrifugal casting machine arm is wound the proper amount of
turns.
-
The correct metal has been weighed for the flask being cast
If the above check list is complete, you are now ready to cast. Light the casting torch and preheat the crucible including the exit hole. Preheating the crucible assures a more even and faster melting. Place the metal in the crucible and melt the metal. When the metal is in its liquid form and the top or face of the metal is bright shinny and the edges are rounded, it gives the appearance of mercury. This is the indication of the correct metal casting temperature.
38
At this point, if you are working alone, place or secure the torch on a holder making sure the flame is not directed at anything flammable. Using flask tongs, acquire the flask from the burnout oven and place
the flask in the casting machine making certain that the entrance hole
of the flask is forward to mate with the hole of the crucible. Push the crucible forward until the baffle plate is up against the flask. The tip of the crucible must be in the center of the button hole of the flask. Since the metal has been previously molten, it has retained enough heat that you will be able to re-melt the metal rapidly. When the metal reaches the state previously described, hold the melting torch in your left hand but be sure to continue to apply heat to the metal. With your right hand grab hold of the end of the casting arm on the weight side and pull slightly forward. This will release the stop or locking post. Release the arm as in a throwing motion with a follow through as opposed to a jerky release.
If you have someone helping you, call for the flask to be placed in
the casting machine when the metal is on the first melt and follow the above arm releasing instructions. UNDER NO CIRCUMSTANCES WILL THE CASTER ATTEMPT TO STOP THE ARM ONCE IT STARTS SPINNING. ALLOW THE ARM TO WIND DOWN ON ITS OWN.
39
With tongs, remove the flask when the arm has stopped. If the red glow is gone from the button, quench the flask in a large bucket of water.
Upon quenching, the investment will break away from the casting. Some investment will still be stuck to the cast piece or pieces which must be cleaned with a brush or investment removing solution. DO NOT QUENCH WHITE GOLD. ALLOW THE FLASK TO COOL UNTIL IT CAN BE HELD IN YOU HAND. ONCE COOL, BANG THE SIDES OF THE FLASK WITH A HAMMER TO RELEASE THE CASTING. The alloys in white gold will cause the metal to become brittle if quenched when hot.
40
CASTING WITH A VACUUM ASSIST CASTING MACHINE
Vacuum assist casting has reached to a point of great popularity.
Not only for the small quantity caster but also in many high volume manufacturing facilities. Vacuum assist casting machines can range in cost from a few hundred dollars to over $30,000.00. Again we will concentrate our efforts on the use of the small vacuum assist casting units using torch melt.
This type machine has the capabilities or capacity to cast small or large quantities.
Contrary to the popular belief that Vacuum assist casting machines suck the molten metal into the flask cavity is incorrect. What actually occurs is that during the vacuuming of the flask at casting, the air that is trapped in the cavity is removed by the vacuum allowing the molten metal to take its place. If the air was not displaced by the vacuum through the porous investment, the air trapped in the cavity would not allow the metal to completely fill the cavity.
41
Crucibles used for this type of casting will also have to be cured with borax. The type crucible used in torch melt vacuum assist casting is the flat cup type and are held in a long handle crucible holder. High back crucibles with larger metal capacity are also available and can be held with the same handle.
Flask preparation and burnout are the same as previously explained. There is no distinguished difference in preparing a flask for centrifugal or vacuum assist casting. Prepare the vacuum assist casting machine for casting by first removing the plastic bell jar and the black rubber pad and store in a safe place away from the torch flame. If you are casting solid flask as opposed to the perforated type flask and your machine
is equipped with the casting well, place the large casting ring with
the small half inch ( 1⁄2”) hole on the casting well with the red gasket between the edge of the well and the bottom side edge of the large casting ring. Next, place the six inch (6”) square or round red pad with the 1⁄2” hole in the center on the large casting ring. Make certain that the 1⁄2” holes on the red pad and the large casting plate are lined up and not covering each other.
42
Preheat the cured crucible and place the metal in the crucible and bring the metal to its proper casting temperature. The proper metal temperature is when the edges of the metal are rolled under and the eye or the top of the metal is bright and shinny having the appearance of mercury. Be aware that some new metal alloys have a silicone brightening additive which appears slightly milky but you will still be able to distinguish the proper casting temperature.
If you are working alone, once the proper metal temperature is achieved, set the crucible down on a protected surface and with crucible tongs, remove the flask to be cast from the oven and place the flask on the
red pad over the 1⁄2” hole. Turn on the motor of the vacuum casting machine, reacquire the crucible with the metal and bring the metal back to casting temperature.
At this point, move the selecting valve to casting. The vacuum gauge will go to its highest reading. Making certain that the metal is at the proper temperature, dump the metal into the button hole as quickly
as possible making certain that the torch flame never leaves the metal until the button hole is full or all the metal is out of the crucible. This is a quick or fast pour. If the metal is poured slowly, it will solidify too quickly and will not fill the cavity.
If you are not working alone, have your helper place the flask on the casting pad on the first melt and proceed.
43
An important point to remember when melting metal is to back off with the torch if the metal appears to be boiling. If this is the case, allow a few seconds for the metal to cool and re-heat. Over heated metal will cause the investment to stick to the casting causing distortion to the surface and also making it difficult to clean the Casting.
Casting using the perforated flask is the same procedure with the following exceptions. The proper size ring must be selected and placed on the casting well with the proper gaskets. Most machines are supplied with a 3 1⁄2” and 4” casting rings to fit those size perforated flask along with the correct size red high temperature gaskets. It is always wise to pre-prepare the vacuum casting machine with the correct casting rings and gaskets. Perforated flask are normally used for casting trees or large castings as this type flask allows for greater displacement of the air trapped in the cavities allowing the metal to flow in easily.
44
Again, emphasis is placed on the importance of the casting temperature of the flask while casting in the vacuum assist casting machine. Along with filling the cavity and controlling the solidification of the metal is the durability of the red silicone gaskets. There is no need to cast any flask above 1000 ̊F which is sufficiently hot enough for filigree and thin items. The gaskets will have a longer life when used at the correct casting temperature.
WHAT ARE THE ADVANTAGES OF VACUUM ASSIST OVER CENTRIFUGAL CASTING MACHINE?
-
Vacuum assist is much faster considering that the caster does not have to wait until the centrifugal arm stops spinning.
-
No danger of throwing molten metal as in the centrifugal machine. With the vacuum assist machine the caster can simply stop his pour if there is too much metal in the crucible.
-
There is no need of having to balance the casting arm which is necessary on the centrifugal machine for each size of flask utilize.
-
A greater variety of flask sizes can be used.
-
Since the vacuum machine is necessary to eliminate air in the
investment, the ability to also cast with the same machine saves the caster the added cost of a centrifugal casting machine.
It is important to always keep in mind these two words, PROCESS CONTROL. Once you achieve success in any endeavor, don’t change the process. The lost wax casting method explained in this book is the same as used by casters all over the world.
PROCESS CONTROL AND FOLLOWING THE CORRECT METHODS WILL GUARANTEE YOU SUCCESS
45
REPRODUCTION OF MODELS
The reproduction of models by means of rubber and metal molds is one of the more interesting aspects of the jewelry industry. Metal molds
are use when details such as in graduation rings and other items that have letters, numbers and other specific details. In this manual we will concentrate on producing vulcanized rubber molds for the purpose of re- production of models.
Presently, there are three methods for producing a mold for the purpose of injecting wax to obtain a wax pattern. These three methods are:
1. VULCANIZING RUBBER
2. SYNTHETIC MATERIAL MOLDS
3. MANUAL PANTOGRAPHS OR CNC ENGRAVERS
In the reproduction of jewelry, rubber molds is the most widely used. Synthetic materials are mostly used when the model to be reproduced cannot withstand heat and pressure. Manual pantographs or CNC engravers are used for making metal molds.
46
EQUIPMENT AND ACCESSORIES NECESSARY FOR VULCANIZING RUBBER MOLDS
1. VULCANIZER 2. MOLD FRAMES 3. VULCANIZING PLATES 4. SPRUE FORMERS 5. VULCANIZING RUBBER 6. MOLD CUTTING BLADES AND BLADE HANDLES
7. CUTTING AID HOOK 8. MOLD CUTTING CLAMP 1. Vulcanizer
2. Mold Frames
4. Sprue Formers
8. Mold Cutting Clamp
There are several different manufacturers of vulcanizing rubber. The best known of the manufacturers is the F.E. Knight Co. product name, CASTALDO. They offer a great variety of natural and synthetic materials in various forms for mold making. The most popular of their product line is the Gold Label vulcanizing rubber which has been the standard of the industry for many years. In the following mold making process, all references pertain to the Gold and White label rubber.
Most vulcanizing rubber vulcanizes in the temperature range between 290 ̊F to 350 ̊F. Castaldo recommends a temperature of 307 ̊F (152 ̊C). Most vulcanizers have a indicator lamp which signals when the heating elements are on. It will be essential for you to calibrate your vulcanizer to cycle between 300 ̊F to 315 ̊F or as close to this temperature as possible. In the event you have a dual heat control vulcanizer, both the upper and lower platen must be calibrated.
Rubber is supplied in 1/8” thick and available precut in standard mold frame size which is 1 7/8” X 2 7/8” with rounded corners.
The following table is the recommended vulcanizing time for the thickness of the rubber mold.
Mold Thickness
1⁄2” (13MM) 5/8” (16MM) 3⁄4” (19MM) 1” (25MM) 1 1⁄4”(32MM) 1 1⁄2”(38MM)
No. of pieces
4 5 6 8 10 12
Minutes
30 (minimum) 37
45
60
75
75 (maximum)
The recommended vulcanizing time for each 1/8” thick piece is seven to seven and one half minuets. The minimum time is 30 minuets and the maximum time is 75 minuets.
MOLD PREPARATION
A metal model is needed to make a rubber mold. The model cannot be of a material that will be affected by the temperature used to vulcanize the rubber. It also cannot be of a material that can be broken by the pressure applied by the platens, nor any low melting temperature metal.
First step is to solder a sprue rod on to the model this is normally a 1/8” round brass rod. The brass rod is known as a sprue former and is supplied with a cone which slides on to the brass rod. This cone forms the correct opening for the standard wax injectors. (FIG. 1) Thicker sprue rods are also available. Be sure the joint is well soldered as pressure will be applied to the sprue rod when cutting or separating the mold. After soldering the sprue rod to the model, the model must then be polished and cleaned. This is necessary as the brighter and cleaner the model is the better the rubber mold.
Select a mold frame that will accommodate the model. A minimum space of 1⁄4” on all sides, top and bottom of the mold. (FIG. 2)
Cut or select enough 1/8” pieces to fit the frame with two extra pieces. If the frame is 1⁄2” thick, it will take four 1/8” pieces to exactly fill the frame. To this, you must add two extra pieces.
(FIG.3)
Select the number of pieces necessary that will be the same thickness as the model. Lay the model on one of the pieces and trace the outline of the model with a ball point pen. Use a common scissor to cut the rubber on the traced line. Also cut the opening for the cone former. (FIG. 4)
DRAWINGS OF FIG. 1,2,3,4
PACKING THE MOLD
Assuming that you have selected a mold frame that requires seven pieces of mold rubber, three pieces would be the center of the mold which will hold the model and of the four remaining pieces, two will be on the bottom and two on the top. The three pieces that will hold the model are sandwiched between the two pieces top and bottom. The model, with the sprue attached, must be as close to the center of the mold as possible.
If using the Castaldo Gold Label rubber, begin packing the mold by first removing the blue protective cover on one side of the mold rubber leaving the yellow protective cover attached and place the rubber in
the mold frame with the yellow cover down. Remove both protective covers on the second piece and place it in the mold frame. The three center pieces that will hold the model will have to be cut out as shown in figure 4 above. Place the first two cut out pieces into the mold frame and place the model into the cut out along with the cone sprue former in place. Using small pieces of rubber fill in every space.
One of the keys to having a successful mold is to fill all the hollow spaces with rubber. If you are making a mold of a ring, be sure to fill in under the head or top of the ring and on the inside of the shank. There is a false thought that the rubber will flow into all the vacant spaces in the model by applying enormous pressure on the mold with the platens on the vulcanizer. A properly packed mold will produce an excellent mold.
With the model in place and properly packed, place the remaining center piece in place. Remove the protective coverings on the next piece
and place it into the mold frame. On last piece, remove only the blue covering and place it onto the mold frame exposing the yellow cover. In the event that the cone sprue former was left out, slide the entire mold from the frame and place the cone onto the sprue and re insert the rubber mold back into the frame.