


PEPETOOLS ROLLING MILL MINI SERIES

Here is a recap of the @pepetools_usa Rolling Mill Mini Series! When I received this mill I hadn't used one regularly since college (2004- 2007), so I thought I should do a deep dive into all the benefits and uses.
INTRO TO THE ROLLING MILL
This first post was about the proper securing and care of my @pepetools_usa 130MM Single Combo Rolling Mill #189.20A
- You must bolt your rolling mill to a secure surface! You want to bolt at least one hole on each side! I placed my mill at the end of a sturdy table, marked with a pencil where I needed to drill, drilled then bolted it!
- Purchase some 3-IN-ONE Oil. This will prevent rust. Rust is going to be the number one enemy of your rolling mill! As you can see in the video I put some on (I might have been a little liberal with the oil 🤣) then I use a shop rag while I rotate the rollers. I like the 3-IN-ONE for daily use and the Simichrome is a bit more abrasive (kind of like toothpaste) good when you need to give your mill a good cleaning!
- When you are done working for the day, and after you’ve oiled the rollers, always keep a gap between your rollers when they aren’t in use! Having the rollers touch can create rust spots if condensation forms. You also want to cover your mill. In one image I use the plastic bag that came on the mill, in another image I have an old pillow case covering it. Your biggest take away should be KEEP YOUR ROLLING MILL DRY
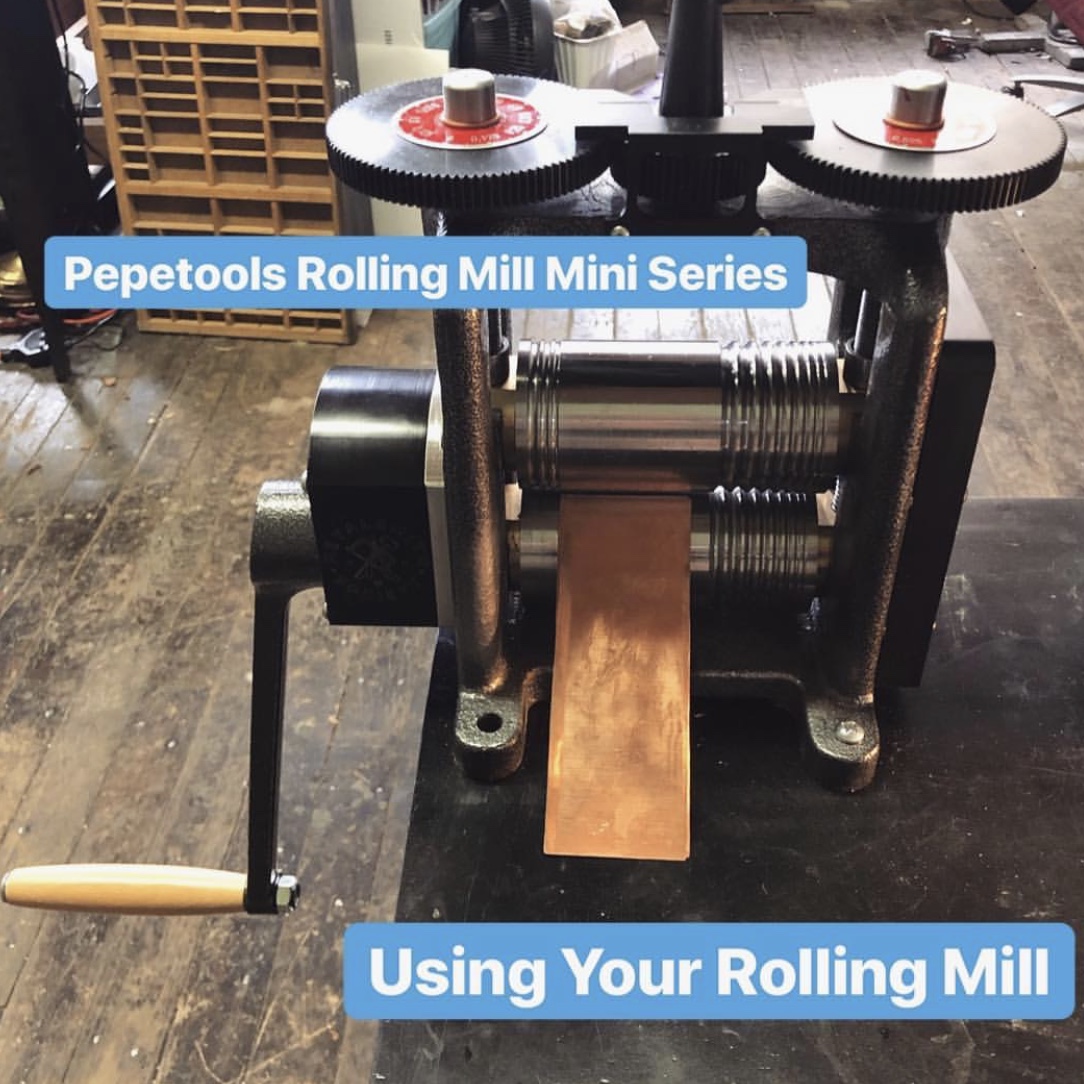
USING YOUR ROLLING MILL
Now that my equipment is safely secured my next step is to create a “sandwich” which is used when texturing metal and protects my mill.
- I created mine with 22g copper, (brass works great too) You can also use a slightly heavier gauge if that’s what you have on hand. I cut my pieces so they fit within the flat aspect of my rollers. If you have a flat mill you can make your sandwich much wider. I took the time to sand so the edges aren’t too sharp while I’m handling it. Now I’m ready to texture my metal! The sandwich protects my rollers from the steel screen which would destroy my rollers if it made direct contact!
- Keep in mind an impression is created on the sandwich as well and these marks will transfer onto subsequent pieces of metal, so you will remake your sandwich in time.
- ANNEAL (only time you don’t need to anneal is the first time you roll dead soft materials)
- Always roll the metal in the same direction in between anneals. This avoids splintering and fracturing of your metal.
- Roll 2-4 times (max) before annealing again (this depends on how stressed the metal becomes!)
- If you do get splintering, file it before you roll again.
- Always turn the T-bar in 1/3 - 1/2 turns to avoid over tightening and deforming metal.
- Never go straight to silver (practice on inexpensive metals in the same gauge).
- You don’t need to concern yourself too much with the dial gauges however to reset them close the rollers until they touch and then set both gauges to zero

WHAT YOUR ROLLING MILL CAN ACCOMPLISH
Here are some main uses and benefits of having a rolling mill in your studio:
- If you have a combo mill the ability to form wire is truly amazing, I like to keep 10g round wire on hand and from that I can create square, rectangular, rectangular textured and half round .
- One of my favorite uses of the rolling mill is having the ability to roll sheet metal into a thinner gauge. This saves money and time when you suddenly have a need for a slightly thinner gauge and don’t want to wait on placing a new order. I also find if I have a small piece of thick gauged scrap I can roll it through several times and end up with a piece now big enough to be used as a base for a bezel or another cut out!
- You can also taper metal in your rolling mill, saving you TONS of hammering time. You could use that method to make a handle for a utensil or a hair stick! To taper you mark your metal with a sharpie and then roll and reverse, roll and reverse tightening the T-bar in small increments!
- I also love the ability to make jump rings and texture them, the possibilities are endless in making awesome, unique chains this way.

TEXTURING METAL
First let’s discuss organic items.
- Always make sure they are completely dry, a fresh leaf or flower will just get crushed and make a mess. I didn’t do anything special with my leaf I just allowed it to dry (skeleton leaves work awesome too!)
- I suggest taping your material onto your “sandwich” this prevents things from shifting on you. I did this for the feather as well.
- Keep in mind anything you texture with will get destroyed in the process! So I would avoid any sentimental materials.
- You can do a wide variety of textures by creating your own cut outs in metal. Since I was just experimenting, I simply drilled some holes. When you roll sheet with cut outs whatever your negative spaces are on your cut out become a raised surface on your sheet.
- Keep in mind paper and cardstock can have acid and formaldyhide, a lot of people sandwich metal with cardstock, just remember those acids can transfer to your rollers and you should thoroughly wipe your rollers down with 3-In-1 Oil at the end of the day as ultimately these acids can cause staining or pitting.
- Sandpaper to texture needs to be done with extreme caution, if the sandpaper were to slip and touch your rollers it could cause damage, so if you do experiment with that be sure to secure it well.
- Other suggestions for materials you can texture with: wire mesh (be careful as the steel mesh will damage your rollers if it comes in direct contact) corn husk, fabric, laser cut cardstock, etched metal, commercially available texture plates.
- I would recommend to practice on base metal, and its always better to roll through with too little roller tension than too much (which can really disform your metal) remember to anneal every 2-4 pass throughs and tighten in small increments!

MARRIAGE OF METAL
I wanted to show off how to use your mill for marriage of metals, which is a process of soldering contrasting metals together!
- You can twist different wires together, soldered them and rolled them through the part of the rollers that make square wire or flatten them!
- You can create “fake mokume gane” not to be confused with actual mokume gane which is fused.You take several layers of brass, copper and silver and solder them together (using hard solder), you then drill holes and use a ball bur to remove some of the top layers. I annealed and rolled through many times until I had a flat sheet with some of the copper and brass showing through! The possibilities are endless! You can mix gold, silver, copper or brass. You do have to be careful if you plan to solder with your fake mokume gane - use medium or even easy solder so it doesn’t fall apart!


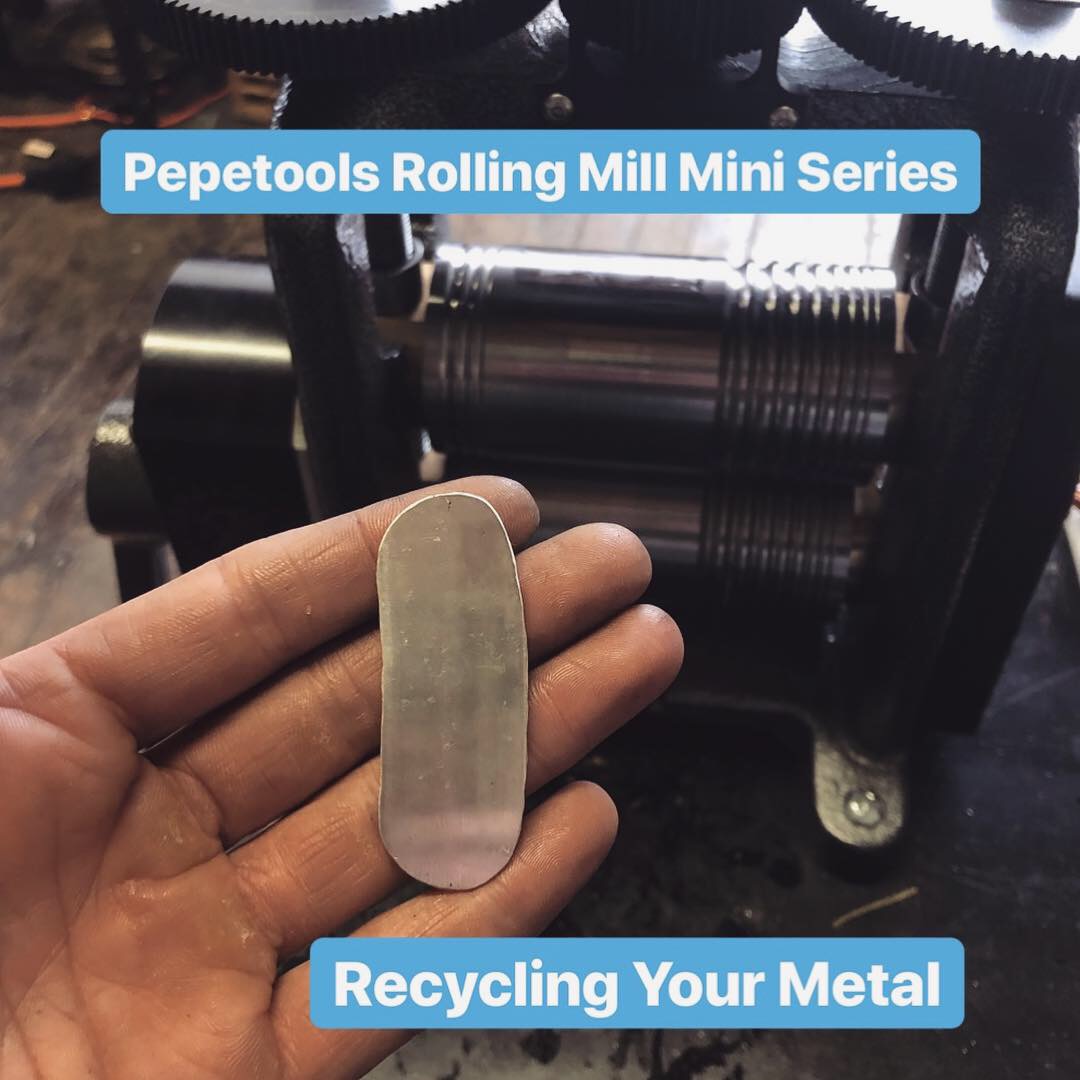
RECYCLING YOUR METAL
You can use your mill to create your own sheet and wire from your scraps!
- First I weighed out my clean scrap (no solder) if you want to use scrap that has solder in the mix it was advised to me to add 50% clean metal - casting grain is a great, because its easy to measure and melt!
- You will need an ingot mold. Being the amateur I am, I ordered one with multiple “strip” options. So mine makes skinnier ingots which translates a bit better to wire and sheets that are narrower. I will likely buy another ingot mold which is more appropriate for creating wider sheet, just so I have the option!
- Your metal will get heated in a crucible, you will want to season a new crucible with a tsp of borax. When heating the borax for the first time be careful not to hit it with a massive flame (it will blow everywhere, ask me how I know 🤦♀️)
- Heat your mold prior to heating your metal so you aren’t pouring into cold steel! Then once you get your metal molton, pour the metal into the mold.
- From there you start rolling! Anneal, roll 2-4 times with the metal facing the same direction between every anneal.
I’m not going to sit here and say this isn’t a labor intensive process because I would be lying. HOWEVER recycling metal is an awesome thing and can be worth it in many instances!
- If a customer gives you metal or an old piece they want you to remake you can use this process.
- When you melt down your own scrap you save money you would have given to the refinery (they typically take 10-20%)
- If you have a combo mill like I do you will be able to create ALL THE WIRE.
- If you have old pieces that never sold, you can melt them down instead of investing more money into your business!